

Monday, July 25, 2011
Stepping up to the bar

Friday, July 22, 2011
Laundry Room Makeover: Part 3


Wednesday, July 20, 2011
How to Christening a Diva

In June, we hosted a baptism brunch for Little Miss Diva. This girl already loves to party! We had lots of family and friends over to help celebrate the day. The menu included ham rolls, spanakopita, Carolina caviar (recipe below), pesto pasta salad, pimiento cheese, fruit, some tasty sweets and of course Baby Diva Champagne.

The Martha Stewart votives really helped to pull the various pink colors together as did the yummy M cookies that my cousin made!

2 (16 oz.) cans black-eyed peas, rinsed, drained
1 (10 oz.) can white shoe peg corn, drained
1 large firm tomato, chopped
1 green bell pepper, chopped
1 small white onion, chopped
4 scallions, chopped
1 cup chopped fresh parsley
2 garlic cloves, minced
1 tablespoon chopped fresh cilantro
1 (16 oz.) bottle Italian salad dressing
Monday, July 18, 2011
Laundry Room Makeover: Part 2
Truth be told, I've been craving a laundry room makeover since last fall, but put it off because somewhere it says pregnant women aren't suppose to be lifting heavy objects. The nerve of some people! With little Miss Diva here and the sink removed, the laundry room was crying out for more help. The shelves above the washing machine could barely hold a penny and didn't have enough clearance to open and close the washer lid. I started pulling down the unsightly wire shelves with my resourceful drill. I really do heart me some demo! It really wasn't a tough process. I just took the screws out and then had to do a little finessing to get the grey plastic anchors out of the wall. (Helpful hint: Use the original screw to help shimmy the anchor out of the wall without much work. Don't worry if the you rip a little of the wall. You're going to have the patch the existing hole anyway.)

Once the shelves were out of my house, I surprised Mr. Diva with a trip to Home Depot. I'm pretty sure he had no idea that the girl he meet on Capitol Hill would turn into such a DIY-er. Thankfully, he puts up with me and my projects! We purchased 2 30" cabinets, some knobs and drywall screws before returning home. We also enlisted the help of my soon to be cousin-in-law, who is quite handy to have around.

The boys made pretty quick work of getting the first cabinet in place, securing with drywall screws into the wall studs. The 2nd cabinet required a little more work. Mr. Diva had to cut out holes in the 2nd cabinet to make way for an electrical outlet and the washing machine cord. Custom Cabinets by Mr. Diva!

What clean freak doesn't love cabinets! All the storage without any clutter staring you down.
Next up: The laundry room walls are stained and marked up from previous owners. With a a fresh coat of paint on the horizons, my inner Monk can rest quietly soon enough!
Friday, July 15, 2011
Laundry Room Makeover: Part 1
A few weeks ago, Mr. Diva noticed that we had a leak in the basement. Plumbing and electrical repairs are above our pay grade, which mean a plumber had to be called. Our house was built in the late 40's and we definitely still have some of the pipes to prove it. After about an hour, the plumbers found the leak right behind our large and in charge cast iron laundry room sink.

It was a no brainer to remove the sink to give us a little more room in the laundry. Some people really enjoy a utility sink, but ours took up too much room in a cramped space. So out dear sink out and in laundry room makeover!

Next up: Pulling out the ugly, poorly hung wire shelves and replacing with cabinets!
Wednesday, June 8, 2011
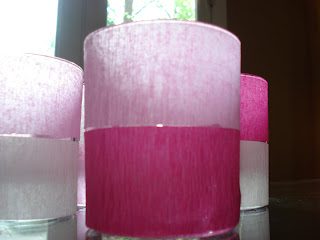
Color me pink!
While I keep one binder just for food ideas, I also keep another one full of decorating, entertaining and garden ideas. What can I say, I have a problem with organizing! Since little Miss Diva's christening is coming up this Sunday, I pulled out the binder to see what party ideas I had to try. As luck would have it, Martha had a fun inexpensive idea that incorporated all the pink I was planning to use.
 I picked up three pink streamers and double sided tape from the party store. Then, I pulled out all my cylinder candle holders and glasses in varying heights. All you have to do is cut the streamers and adhere with the tape. So easy, yet so festive!


Monday, June 6, 2011
Strawberry Fever!
 |
| We ran through the fresh picked strawberries pretty quickly. These are just your typical store bought variety with a little lemon palm garnish. |
A few weeks ago berry fever hit Casa Diva! Thanks to my crazy picking sister, we were blessed with a large batch of fresh juicy strawberries. Mr. Diva has been on the hunt for some good whole fruit popsicles, and since most of my recipes are the mother of necessity, I went to work. The first batch was too tart due to small doses of sugar and out of season berries. The 2nd attempt was far better and still oh so easy.
To start, I hulled about 1 ½ cups of strawberries, pureed and then added in a couple tablespoons of sugar.
 |
| Pureed berries |
Next, I sliced up about ½ cups of strawberries because a whole fruit pop isn’t complete without some chunks! Finally, I poured the mixture in my newly acquired molds, plopped in a few slices of strawberries and froze.
 |
| Strawberry pop ready to go. Run these molds under hot water for a few seconds to loosen. |
Friday, June 3, 2011
The FAC of the Matter
Ahh Memorial Day, the unofficial start to summer! I love the feel and smell of this season. It just puts me in a wonderful place. As I sat on our patio sipping a delicious summer white, I started thinking we really need to have more afternoons with friends enjoying this space, especially after all the hard work I’ve put into our yard. Why not show it off!

Back in college, we used to do the Friday Afternoon Club, affectionately known as the FAC. It would start whenever we rolled out of bed or class and last until the sun went down. It was a great excuse to hang out and get ready for the weekend ahead. Since old is always new, I’m bringing it back to Casa Diva! If you’re in the neighborhood, stop by and have a drink or two.
Are you a diva follower? You should be! Click here to make it happen.
Wednesday, June 1, 2011
Gardening Diva: Summer 2011 Updates
 |
| Before: We inherited a backyard full of beds and weeds! |
My gardening obsession started when we moved into Casa Diva, a little over 2 years ago. It really took me by surprise. I never thought I would care to dig into the sometimes tough ground and make room for pretty blooms. I didn’t see myself spending hours killing weeds and churning compost, but here I am. Mrs. Greenthumb I’m not, but I’m definitely learning.
 |
| After: It's still a work in progress with more sod and bushes to come, but a vast improvement. |
I’ve been rewarded the past 2 springs with returning favorites
 | ||||||
| We have lots of shade, which means plenty of space for hostas! This hosta type (Hosta Olive Bailey Langdon) is my absolute favorite as it grows large with it's beautiful leaves! | . |
 | ||||
| Patriot Hosta is all over my yard and can really fill out. Believe it or not, some of my hostas were confined to a window box before we moved them to their new home! |
 |
| My favorite garden bed! I've worked hard on the hosta and vinca border. It's really lush and beautiful right now. |
and tempting the fates with new ones.
 |
| Astilbe: I've 4 of these shade lovers for background interest in the hosta bed. |
 |
| Viburnum: I've planted this shrub in a bed next to my backdoor. I'm going to call it the godmother bed as she was the reason for all the plantings! |
 |
| Another godmother bed plant: Caladium |
 |
| Salvia: I've planted 2 different types of Salvia in the yard. Hopefully, I can keep it alive! |
 |
| The beverage cart is decked out with purple verbena and hot pink geraniums! |
 |
| The ivy is a constant in my window boxes throughout the year. I love how it cascades over to create more interest. This season I've placed verbena in between for the color pop! |
 |
| I picked up some pillows to spruce up the patio table. These pillows were made by the fabulous Paula and Erika at Etsy! Be sure to check them out. |
I'm off to enjoy the patio until my next post!
Are you a diva follower? You should be! Click here to make it happen.
Are you a diva follower? You should be! Click here to make it happen.
Tuesday, May 31, 2011
Lemony Balm: A Series with Questionable Results
 |
| Freshly planted herbs! |
As you might have noticed, I have a huge mess of lemon balm in my herb garden.
 |
| Lemon Balm |
I’ve made it a summer goal to use it more often. First up, I made a simple lemon cheesecake and chopped up the lemon balm to give it a little zing. Sadly, I’ve learned that while this herb smells oh so good it doesn’t pack a huge flavor punch. Even worse, Mr. Diva thought I was trying to sneak in a veggie to his sweets. First mission: Fail!

Since I needed to trim back this ever plentiful perennial anyway, I plopped a bunch into a mission jar adorned with a raffia bow. Viola an instant flower arrangement without touching the wallet! 2nd mission: Success
Saturday, May 7, 2011
Diva Delight: Big booty hose come with it!
You know you're a homeowner when...

This spring Mr. Diva and I have been hard at work trying to grow some grass before the heat waves set in, which means lots of watering. We have 2 sets of hose with wranglers that always seem to get knotted or kinked up. It's a real pain when you have lots to water and even worse when the hose sits in a mud pit.

Enter Frontgate. Mr. Diva discovered their retractable hose a few weeks ago while reading the WSJ. From the way we talk about it you would think we had struck gold...garden gold! This gadget is well worth the expense and is the perfect present for any gardener or perhaps a little Father's Day treat.
Friday, April 29, 2011
Fit for a pansy or two

A few weeks ago, I was busy tinkering with my dining room centerpiece, which meant that my old one was left just hanging out. It's easy to get inspired from other bloggers who re-purpose old, unwanted items in creative ways. I had wanting to spruce up my patio a bit for an upcoming party and thought a new little planter would help the cause. I picked up a natural liner from Big Lots, some violas and pansies from Home Depot (I really can't resist blooms in spring) and had some leftover dirt from another project. After a quick assembly, here's the end result!

More pictures to come of the patio update!
Wednesday, April 27, 2011
Feeling Arty

Before the baby arrived, I took nesting to another level. It is one thing to clean out the closets and freeze casseroles, but my need for projects to occupy my pregnant time really took over. You'll remember the topiary project, new drop cloth curtains, and dining room mini makeover to name a few. Well believe it or not, there were a few more that I didn't get a chance to write up before the little diva arrived. One such project was the art wall in my living room.
Gallery/Art walls are the latest must do project in the blog world. To be honest, I really thought this project was just too much work and was on the way back burner. Since the little miss decided to wait a few extra days, I was left with no choice, but tackle the wall or face pregnancy frustration. The picture above is what our living room looked like when we first saw the house. You'll notice the mirror on the left wall, which is covering a high electrical outlet.

Since I already had a mirror above the fireplace, I rematted and framed a Charleston print to cover up the offending outlet. Over the next few months, I could never shake the feeling that the wall wasn't complete. Enter the art inspiration.


I used newspaper templates to space out on the wall and then set to hammering. I futzed a little more with frame options and placement before I was really happy with the end result.
 | ||||
| Gallery Wall Art |
Wednesday, March 16, 2011
Lemon Obsession

I love lemons. In fact, I love them so much I bought a lemon tree! It's growing in my sunroom and has 4 little blossoms on it. Who knows if I'll actually get fruit from it, but I'll take the delicious aroma in the meantime. While I was out in blogosphere the other day, I found a recipe for lemon cupcakes with lemon icing. Mmmm lemony icing! After a few weeks of home projects, it was time to get back to trying out some recipes. I followed this one to the T up until the garnish part. In honor of St. Patrick's Day and simplicity, I decided to forgo the Glazed Lemon Peel and just garnish with some green sprinkles.

Along side a glass of cold milk, they were delicious and are happily at home in The Binder. Side note: While I was letting the butter come to room temperature, one stick mysteriously disappeared. I'll give you one guess who the culprit was.

Tuesday, March 15, 2011
Happy Birthday Manning!

Monday was Manning's 1st birthday. I'm not one to let any birthday slide, human or pet, so in honor of the big occasion, I headed over to See Spot Eat. They have a wide array of treats and toys. Their treats are very reasonably priced and you can even custom order a cake if time & budget allow. I opted for just a few dog friendly sweets.

Manning was happy to scarf down his treats before playing a few rounds of tug-o-war with Mr. Diva.
Monday, March 14, 2011
Drop Everything

I promised more crazy projects and I hope this one delivers! With all these home improvement blogs out there, you really have no excuse for boredom and a major one for procrastination. Enter A Soft Place to Land. I'm really not sure how I discovered this one, but loved the drop cloth curtains. The no-sew aspect put me over the edge since I don't have a sewing machine. I hit up Lowe's and picked up a few drop clothes to try. At $8 a pop, I figured this project was an inexpensive adventure.

After pulling them out of the bag, I tossed them in the washing machine to pull out any potential shrinkage, tossed them in the dryer and finally pulled them out a tad damp to iron. Then, I folded over part of the top portion so a) I wouldn't have to hem and b) I could have a nice edge for my ribbon (acquired from Joann's).
 | ||
| I guess this is ribbon or perhaps a notion whatever that means. |
After all the panels were painstakingly ironed, I used some fabric glue to adhere the navy blue notion.

It didn't take long to dry, which meant my before and after was nearing completion. I futzed with the curtains to make them lay just so and tada here's my after!

At about $10-11 per panel, I'm definitely pleased with the finished result. You can't find curtains that cheap at Target!
Next up: I hear Martha calling and it's time for another recipe or two.
Subscribe to:
Posts (Atom)


